One of the tasks that people tend to focus on during pregnancy is creating and decorating the nursery — which can be so much fun, but also a lot of work depending on how detailed you want to be. For a lot of families, babies will usually room share with the parents until about 6 months old. I understand that this timing varies widely by family, but it is very common for babies to sleep in the same room as the parents until they’re a little bit older and the risk of SIDS is lower.
In reality, the nursery preparation is a task that does not necessarily need to be completed before baby arrives. However, as you know the Accounting Momma, I definitely made sure we completed the nursery before our daughter was born. I wanted everything to be ready to go in her nursery, so that when we decided to use the room for her, it would be ready. We also knew that we would have much less free time to work on the nursery once our daughter joined us, so it was best to get it completed beforehand.
Where to Begin
How do you start building a nursery? I am not a creative person (although I’m trying to get better!), so figuring out how I wanted to design/ decorate a nursery was a challenge for me. I, of course, turned to TikTok and Pinterest for inspiration (and tips & tricks!). Social media is one of the easiest ways to figure out what you like vs what you don’t like.
Also, surprise surprise — I also turned to an Excel spreadsheet for my nursery preparation! This Excel spreadsheet helped layout a timeline for accomplishing everything we needed to get done in the nursery, as well as budgeting! As with all things, I wanted to make a nice, cute room for my daughter, but I didn’t want to go overboard with spending.
Room Color
Again, I am not creative, so my first thought was since I’m having a baby girl, we should do a pink colored room (I know – how stereotypical of me). I wasn’t looking for a bubble gum/ hot pink color (although I did paint my room hot pink when I was in my teens). I wanted a shade of pink — either a light pink or a pink with a tinge of orange (coral) or pink with a tinge of blue/purple (mauve).
After scrolling through Pinterest and Instagram looking at wall colors, it was time to put eyes to paint. Our first stop — Home Depot, where we collected multiple paint samples. Even though deep down I knew I wanted a pink-related color for our daughter’s room, we also looked at other paint options (such as shades of green and purple). We left Home Depot with way too many paint sample cards.
Once we narrowed paint colors down to two or three, we purchased small paint sample cans to test on the nursery wall at home. We put all three paints next to each other on the wall to assess which one we liked the best. In the end, we chose a coral-pink color. I wanted a color that would pop, but wasn’t too bright.

Room Layout
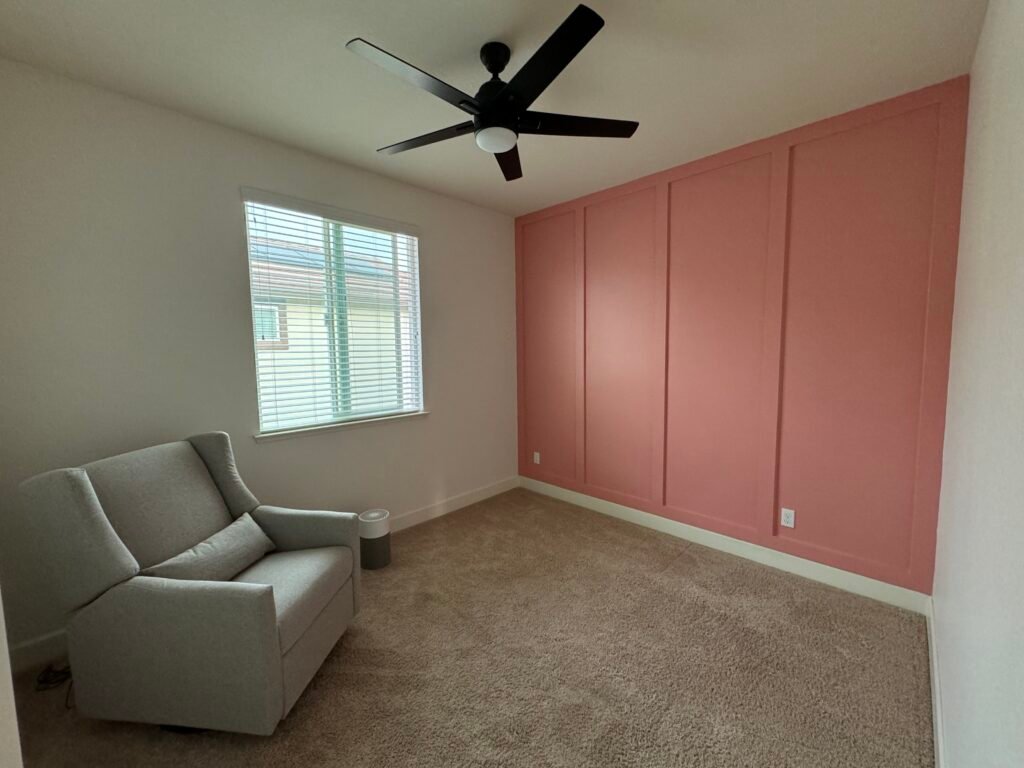
We decided to do an accent wall instead of painting the entire room one color (which in my opinion, an accent wall is so much better—1) less painting and 2) it accentuates the room). Now there are so many different accent walls out there, it was difficult to decide on which one I wanted. I also had to think about the manual labor and feasibility of designing the accent wall (cue husband!).
Manual Labor
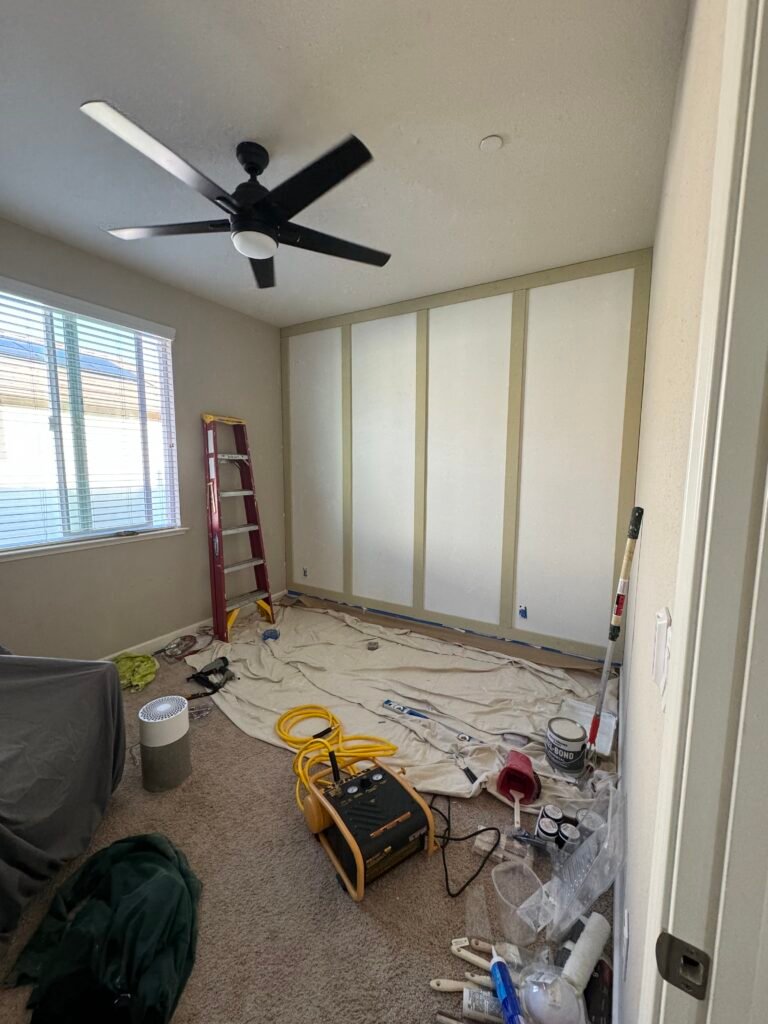
I like the simple panel look for an accent wall, so we decided on a four panel accent wall for our daughter’s nursery. While I call the accent wall design simple, it was by no means a simple task for my husband (bless him for creating the nursery look I desired!)
He can speak to the details involved in creating the accent wall, but I can provide a high-level overview. First, since the wall was textured, my husband had to smooth out the wall. He thinned out a joint compound and spread on the wall. He then had to sand it down to make it smooth and even. He applied primer on the freshly smoothed out wall after that.
Next came the panelling. We purchased wood boards to use as the panels—we were making a 4 panel wall, so we needed seven pieces of board. My husband then had to cut the boards to fit with our wall. My father-in-law helped my husband attach the boards to the wall. He then caulked all the seams and applied primer to the boards.
Lastly came the painting. While my husband didn’t let me partake in the painting, as he didn’t want to risk the paint fumes and my growing fetus haha. He applied two coats of the coral pink paint to the wall. And it turned out beautiful!!
Overall, the accent wall probably took about a couple of weekends to complete. My husband did a phenomenal job and I’m so thankful that he helped bring my nursery vision to life!
Decorating
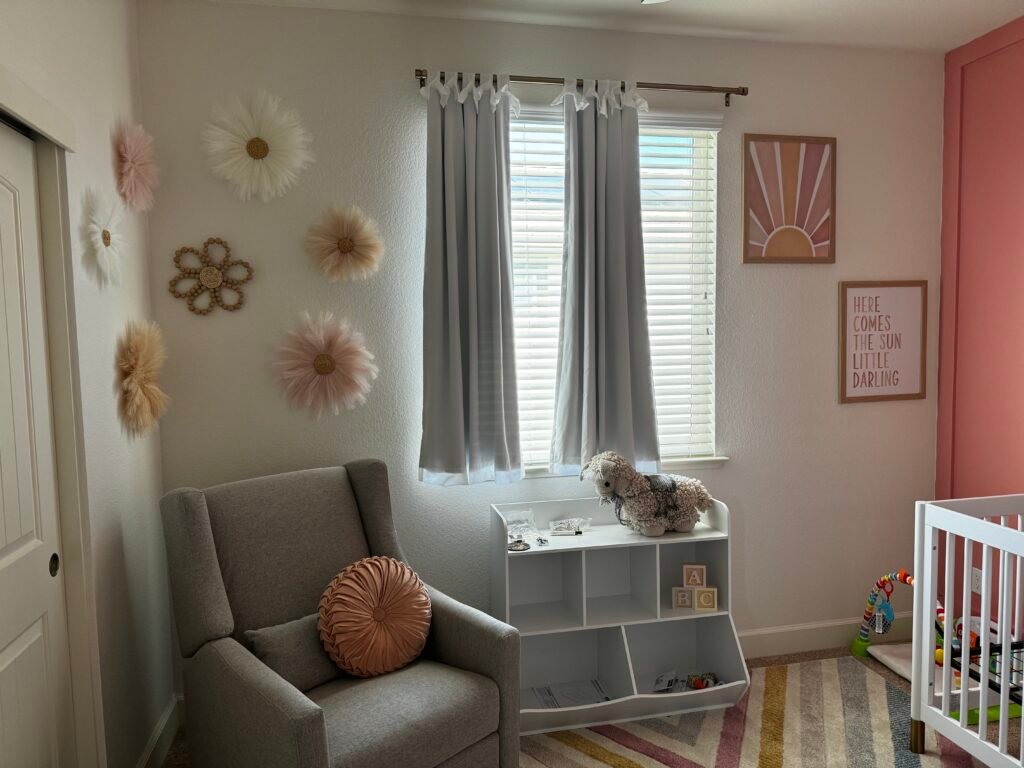
Next came the fun part (for me)—decorating!! While I don’t consider myself to have a creative touch, I really enjoyed decorating the nursery and picking out all of the decor! I didn’t really have a theme in mind for the nursery; I went based off of my Pinterest, Etsy and TikTok searches to find what would go well with the accent wall color. In the end, the nursery had somewhat of a boho chic vibe with muted rainbows and pink/beige floral.
Note: As an Amazon Associate I earn from qualifying purchases.
Nursery Furniture
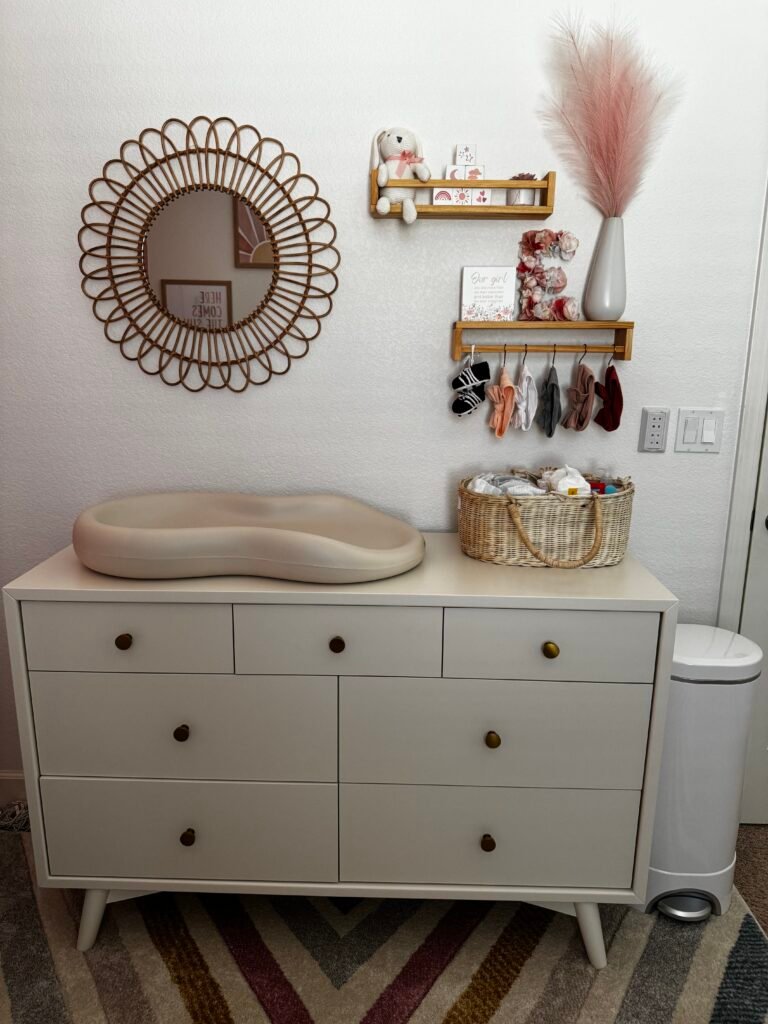
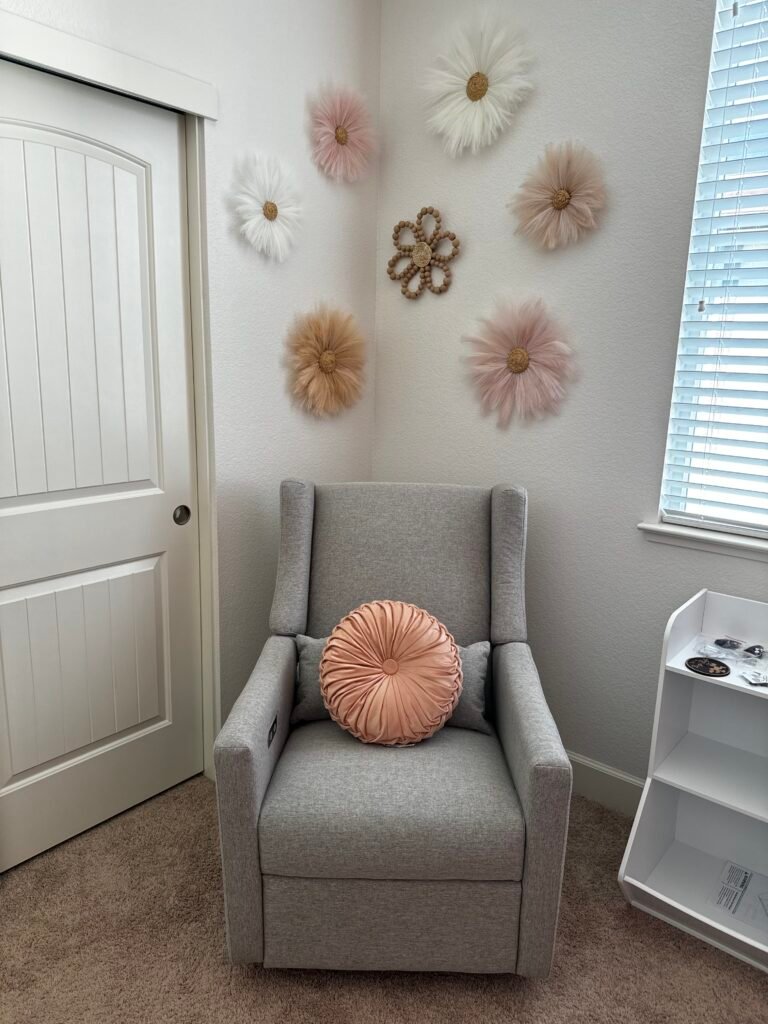
To start, I’ll make note that for nursery furniture we chose white furniture with gold accent. After lots of research, we decided on the Babyletto brand for our nursery furniture (Gelato 4-in-1 Convertible Crib, Palma 7-Drawer Assembled Double Dresser, Kiwi Electronic Recliner and Swivel Glider). This brand has great reviews and the quality looks great! While we did have some hiccups with a few minor pieces, Babyletto’s customer service was excellent and I would recommend them. Below are the exact furniture pieces we selected, and as you can see the dresser and crib are both white. The crib has gold feet and the dresser has gold knobs (purchased separately). We didn’t want a white glider, in case of accidental spit up, so we chose a soft grey color that we felt would match with other colors in the room. One thing we loved about Babyletto was that you could order free swatches of the fabric, so we were able to test out which fabric color/material we liked best for the glider.
Rug
As the nursery furniture is white, we decided to use the decor to add pops of color throughout the room. I started first with the rug, as that is the base of the floor in the room. We were looking for a specific size rug, so the sizing narrowed down our search a little bit. We looked at multiple stores including Wayfair, Home Depot, and Macy’s to find a rug that would fit the boho chic aesthetic. We purchased this rug from Home Depot and it looks perfect in our daughter’s nursery! I love the subtle pops of pink, yellow and blue to tie the room together on the floor.
Wall Decor
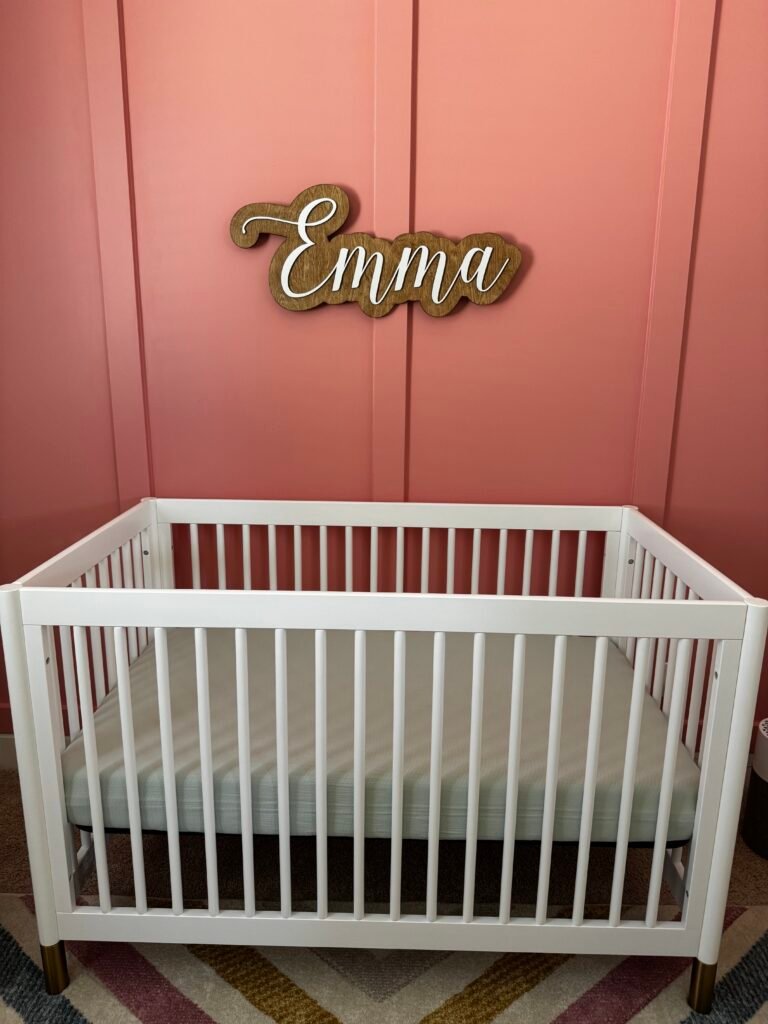
We knew the crib was going to go against the accent wall, but the wall was missing decor to add a little bit more oomf. I saw multiple Pinterest boards with name signs on the accent wall, and I knew that’s what was missing. I found a cute name sign on Etsy and worked with the owner to make sure the style and fit were exactly what I was looking for. The name sign added a simple touch of decor to the already pleasing accent wall.
Besides the accent wall, there were 3 other walls to potentially decorate. One wall has the dresser against it, so I had specific searches for “dresser decor”. Another wall has the closet, which takes up a large portion of the wall, so there wasn’t much room for decor on that wall. The last wall has the one window in the room, so there were two sides of the window to decorate.
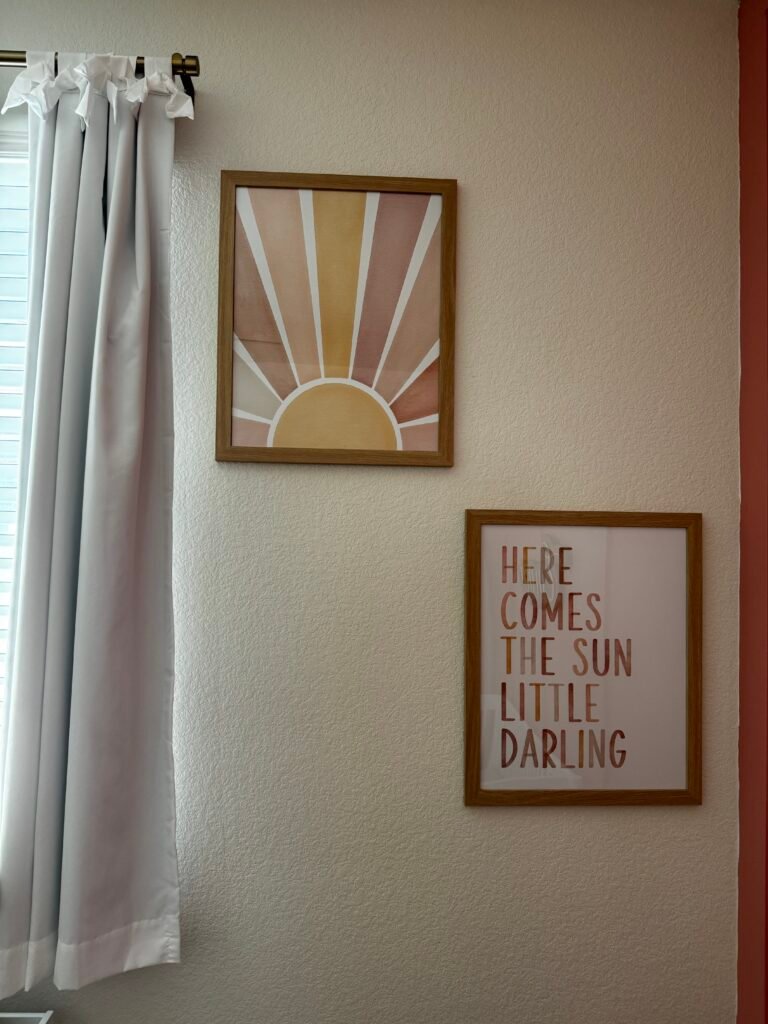
I’m not sure how I even found it (I couldn’t find in my inbox) — I assume some Pinterest search of “boho chic wall decor”—but I found the cutest prints for wall decor. I ordered the prints online and then printed at my local Walgreens. My husband and I have always loved the Beatles — our bridal party walked down the aisle to ‘Here Comes the Sun’. As such, when I saw these wall prints, I knew they would make the perfect addition to the nursery! The coloring of the prints ties in with the coral accent wall, and the sun design ties in with the rug pattern.
The wall prints would help decorate the right side of the wall with the window. The other side of the wall with the window had the glider in the corner. I found these super cute flowers in varying sizes/colors to go on the wall (thanks TikTok). The different sizes allowed me to take up more or less wall space depending on the look I was going for. Given the closet spacing, I was able to put the flowers on two different walls, so they sort of encapsulated the glider.
For above the dresser, I knew I wanted to have a mirror, along with some shelves. I found the cutest boho mirror on Wayfair in this flower shape, which helped tie together the florals on the other side of the room. For the shelves, I saw a unique idea to have one shelf upside down and one shelf right side up. That way I could have hooks to hang bows from on one shelf. For shelf decor, I kind of haphazardly pulled together white & pink items (stuffed animal, blocks, etc.). I found a white vase with fake pink pampas grass at Home Goods; I found a floral “E” on Etsy; and I found a little wooden sign with a cute saying on Amazon. In the end, I think everything tied together and I liked how it looked.
Toys
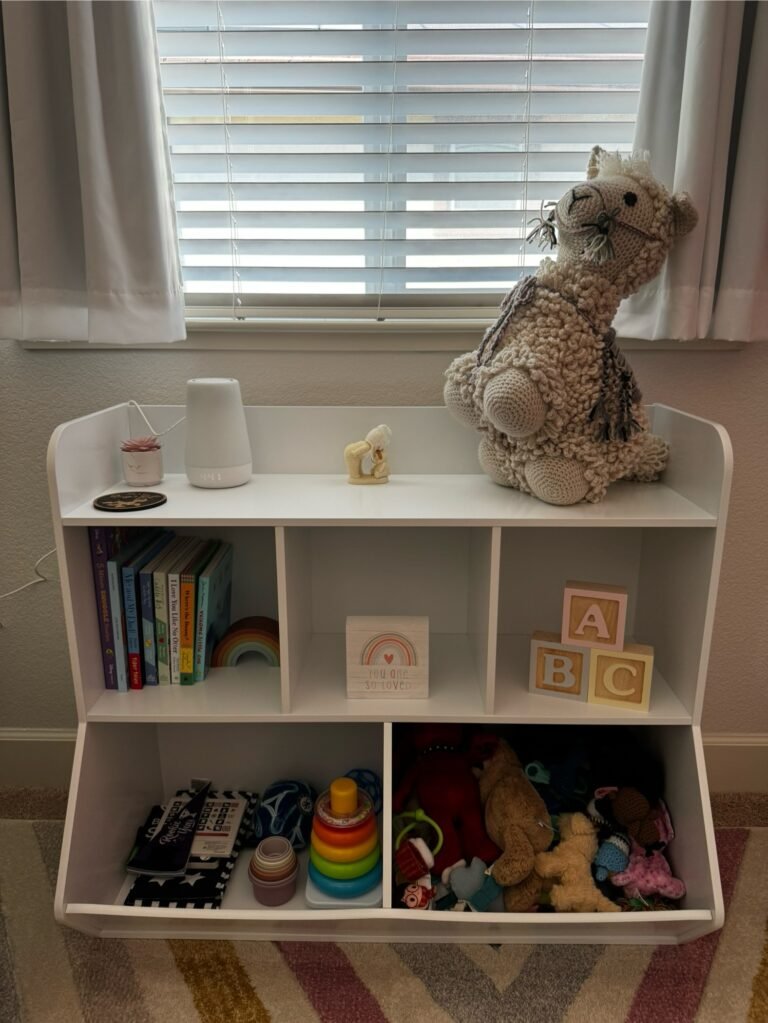
Lastly, I purchased a toy shelf on Amazon to help store all of the toys and books for my daughter. I also bought these super cute ABC block letters on Etsy to use as shelf decor. My daughter still loves playing with them today — taking them on and off the shelf. Her toy shelf has only grown with even more toys now, and we rotate them out for her.
As we know our daughter will have lots of toys growing up, we also installed cube storage organizers in her closet. This helps organize all of her extra toys and books that don’t fit in the toy shelf. We also purchased the fabric storage cubes to go inside the organizer, and it turned out great. Highly recommend these cube organizers!
Blinds and Curtains
You will hear time and time again about blackout blinds/curtains and how important they are for baby’s sleep. While I agree that the ideal nursery room lighting is dark, blackout blinds aren’t necessary, as long as you have curtains that block out a majority of the light. I think there is a benefit to having your baby sleep in a dark room, as their circadian rhythm develops. However, some parents like to have their baby learn to sleep in loud, bright environments. But I think this comes with age – a baby will learn to sleep in different environment types (in a pack n play in a hotel, in a car seat in the car, etc.).
We did purchase blackout curtains to assist with blocking out the light (as during part of the day the window in the nursery gets a lot of sun). We used a gold curtain rod to hang the curtains from, to tie in with the other gold accent pieces. I wanted white curtains with a cute bow accent to add a pop to the window. And the blackout piece of the curtains works well! Our only fault was installing them just a little bit too short to not have the blackout part of the curtains cover past the window sill. To help get more light blocked out, I used little trinkets to sit on the curtains on the window sill.
To avoid this, we ended up also purchasing blackout blinds to replace the standard white blinds that came with the window. These work very well and I would recommend, as they are customized to fit your window. Again, while I do like the blackout curtains, I don’t think they are a necessity.
Miscellaneous Recommendations
One area I spent multiple hours of research on was dresser organization. I’d like to think I’m a very organized person, so I wanted to have the dresser set up in a way that would be most useful for having a newborn.
There’s many different dresser styles (6 drawer vs 7 drawer, varying size drawers, etc.) and many different methodologies to organize baby items. I ended up using TikTok for visual reference to see how I wanted my nursery dresser to be laid out, and it was very helpful.
I ended up using the adjustable dividers and the cube organizers to store both baby clothes and other baby items (diapers, wipes, bibs, medicine). Make sure you measure appropriately to get the correct size organizers. The dresser we got had varying drawer heights, so we had to get different sized organizer cubes for different drawers (which was kind of a pain).
My Dresser Organization
As a reminder, we have the Babyletto Palma 7-Drawer Assembled Double Dresser. The overall dresser size is 53”L x 19”W x 34.25”H. The top 3 drawers measure at 4.25″H x 14.75″W x 14.75″D and the bottom 4 drawers measure at 6.25″H x 23.25″W x 14.75″D.
Top Left Drawer
I use one cube organizer to store one stack of Copper Pearl Burp cloths and one stack of Muslin Burp cloths. On the side of the cube organizer, I store Copper Pearl bibs.
Top Middle Drawer
I use three cube organizers to store all of our daughter’s personal care/ medicine. One cube organizer has all of her ointments and creams. Another cube organizer has her thermometers, tooth brush/paste, hair brush, nail clippers, and pickers. And another cube organizer has her snot sucker, saline spray, etc. All of the medicine (Tylenol, Motrin, gas drops, etc.) and their syringes go in between the cube organizers.
Top Right Drawer
This drawer I am considering finding another use for. Currently, it is a drawer for one row of diapers, and two packs of diaper wipes. I have the spare diapers and wipes in a drawer in case the diaper caddy runs out. However, if the diaper caddy ever gets low, I’m very good at refilling it. So I think this drawer can be repurposed for another use (TBD).
Middle Drawers
I use both of the middle drawers for clothes. As my daughter has grown, I’ve used a combination of the drawer dividers and the organizer cubes (depending on what I’m storing in the drawer). These drawers are the largest and store the most, so it’s easy to find any clothing item I need.
I typically keep tops/bottoms in one drawer, and the other drawer has pjs/ miscellaneous outfits. I do use the closet as well to hang up shirts, but I try to utilize the dresser the most as it’s easier to grab and change her.
Bottom Left Drawer
I store sleep sacks in this drawer, as it’s an easy grab and put on item after we put our daughter into her pajamas. I also keep some of the bigger clothing items (jackets, puffy onesies, etc.) that I want to easily grab.
Bottom Right Drawer
This drawer stores a mix of items from socks to swim suits to bows/ hair accessories. I use organizer cubes to organize this drawer as it’s easy to interchange the items that I need.
Honestly, there are so many ways to organize a nursery dresser. I highly recommend watching TikToks or looking on Pinterest for ideas — it really helped me figure out how exactly I wanted to organize. You’ll want items that you need immediately in the dresser, so you don’t step away from the changing pad with baby.
And be prepared for the dresser organization to change as your baby grows. It’s kind of a trial and error situation to see what you might need most urgently and adjusting as needed. Oh, and TikTok was super helpful in baby clothes folding! There are lots of ways to fold and store baby clothes in a dresser. I like the front to back stacking, instead of the top to bottom stacking (as I like to be able to see each clothing item when selecting an outfit). Social media is your best friend for dresser organization tips and tricks!