As my daughter recently turned one, I sit here reflecting on the past year – the ups and the downs, the trials and the tribulations, the happy tears and the sad tears. Everyone tells you that time flies, but after going through year one, I can say that I truly feel the age ole saying of the days are long, but the years are short. I think that is a large part as to why I want to start a blog – so I can journal my experiences of motherhood. Motherhood has been the wildest adventure I’ve been on, and I want to remember every part of it, including the good and the not so good. I hope that one day my daughter will read my blog and gain insight into what it was like raising her from her momma’s point of view. I also hope that my blog can help other mommas relate their experiences, and know that they are not alone, as well as providing any tips/recommendations that may be useful.
Fittingly, the first post will be about my daughter’s first birthday party. There are two types of people in the world – those who prefer a small, simple gathering to celebrate and those who prefer to go “all out” with celebrating – and I found myself leaning more towards the latter type (sorry hubs!). My rationale was that this was our first child’s first birthday party, and we were celebrating ONE whole year of being a family of 3. I figured that if I had the energy and the desire, I should plan a first birthday party to remember. My husband and I have also never hosted a party before, so I thought this was the perfect reason to start. And there’s nothing like the first time!
Themes
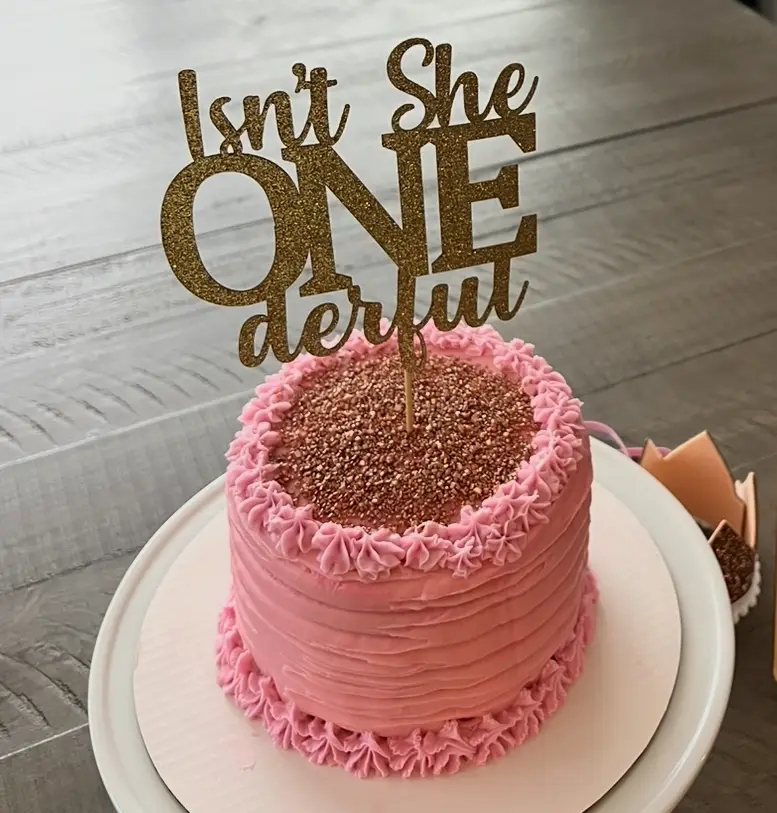
One thing to know about me – I’m Type A and I like planning and scheduling. So the party planning started pretty early, around January/ February (and my daughter’s birthday is in June). The first step I took was to pick a theme, and oh my gosh there are SO many amazing 1st birthday party themes – from Berry First Birthday to One in a Melon to First Bee-Day! We decided on an ‘Isn’t She Lovely, Isn’t She ONEderful’ theme. As some backstory, her nursery has a poster with the phrase ‘Here Comes the Sun Little Darling’ which we love as a nod to The Beatles – Here Comes the Sun. So, the ‘Isn’t She Lovely, Isn’t She ONEderful’ theme was another nod to music (Stevie Wonder – Isn’t She Lovely). Choosing this theme also left the décor to be a bit more open, as there wasn’t a tangible idea tagged to this theme (such as Berry First Birthday and berries or First Bee-Day and bees). I knew that I wanted to DIY a few pieces of décor so it worked out to have a non-tangible theme to go off of.
Invitations and Guest List
The next step was picking invitations and setting the guest list. As a millennial I took the electronic invitation route (through Evite) as it was so much easier for me to edit, design and send out the invitation via a website (I purchased a template through Etsy, edited the template on Corjl and saved as image to upload to the Evite site). One comment on invitations, if you decide to send out invitations early like I did (2 months before the event – I couldn’t help it, I wanted to plan accordingly), make sure you pick a party time that works best for your schedule at the time of the party. Initially, I was trying to schedule the party around my daughter’s nap time (which was ~10am-12pm and 3pm-4pm in April), so we set the party start time as 1:00pm; however, I did not think about her nap schedule changing before the party date. My daughter moved up classes at daycare in early June, which caused her to shift to a one-nap-a-day schedule, which is from ~12:30pm-3:00pm. My initial thought was ‘shoot what am I going to do, she’s going to be asleep for most of the party?!’ While I am a Type A planner, I have been able to reduce my need to have a schedule/plan since having a baby, and we have been able to adjust our daughter’s nap schedules on the weekend to follow her sleep cues. So on some weekend days she is on a one-nap schedule and some days she is on a two-nap schedule. For her birthday party she was able to do a two-nap schedule, which worked out perfectly with the 1:00pm party start time. And I didn’t want to change the party start time last minute given that I sent my invitations out already. I had initially considered an 11:00am start time, but the 1:00pm start time was perfect for my husband & I as it allowed us ample time in the morning to pick-up last-minute items (balloons, cupcakes/cake) and set everything up (food, décor, etc.) before everyone arrived in the afternoon. Also, when setting the guest list don’t be afraid to limit it to people who YOU want there, not people who your family may want there (i.e., extended family). We wanted to include immediate family (only) + friends. To be honest, we viewed this party as a way to celebrate with our immediate family (who most of them we see often as they live nearby), as well as our friends who have been by our side (despite all of the cancelled plans due to baby getting sick (or baby getting us sick)). We ended up (somehow) inviting 58 people (I know – crazy! I didn’t even think we knew that many people) but only 30 people came (which was also crazy!). I was expecting a party size closer to 20 (and that number included more than half being immediate family + us). In the end, the party time and the number of guests all worked out, but make sure you set your expectations with party size by trimming down your guest list if you don’t want to host a lot of people.
Decor
After invitations/ guest list, came the fun part – décor! We went with boho/rainbow décor to tie in with the ‘Isn’t She Lovely, Isn’t She ONEderful’ theme. For décor it was Pinterest, Etsy and Amazon through and through! These sites gave me all of the inspiration I needed to party prep, as well as purchase most of the items. Amazon had a whole ‘Isn’t She Lovely, Isn’t She ONEderful’ themed décor kit for $35.99 including: a balloon arch kit, newborn to 12-month photo banner, backdrop, crown, highchair banner, milestone poster, balloon boxes, and cake topper. For everything that was in the kit, the price tag was a steal, and all of the items were used. However, as I mentioned before, I did lean a little more “all out” than most, so I definitely purchased more décor. See below for all of the décor I had at the party and my recommendation of whether the décor was a debit (positive) or credit (negative)! I’m the Accounting Momma, of course I’m going to be using accounting terminology in my blog posts – we want to add debits to our life (increase our asset’s value) instead of credits (which decrease our asset’s value).
Note: As an Amazon Associate I earn from qualifying purchases.
- Boho Party Kit (Amazon): As mentioned above, this kit had a lot of value for what was included. The kit definitely included all of the ‘basics’ for party décor and was well worth the money. The balloon arch kit ended up having enough balloons to make the arch work for the size backdrop I had (~4′ x 7′); however, if you are looking to do a grand balloon arch, you may need a kit that has more balloons included.
Overall this was a debit to the décor for sure, as it was a great base/ starting point for all of the party décor.
- First ONEderful Year photo board (Etsy): I ordered this photo board from Etsy in size 4×4 photos, and it was the cutest addition to the party décor. It summarized my daughter’s first year in photos (separate from her monthly birthday photos, which were hung as part of the newborn to 12-month photo banner included in the Amazon Boho Party Kit). It was so hard picking out only one photo for each month, as our camera roll has been filled with photos (and videos) of our daughter since she was born!
Definitely a debit to the party—this photo board added a sweet touch to see the growth of our baby month over month, as well as for guests to see photos that had not previously been shared on social media.
- Isn’t She Lovely, Isn’t She Onderful 1st Birthday milestone board (Etsy): So many Etsy shops that have birthday party invitations also have matching birthday party décor, including this shop where I purchased both the invitation and milestone board. Similar to the invitation, I purchased the milestone board template, edited it on Corjl and printed at my local Walgreens.
I consider this a debit—this milestone board was a cute way for guests to learn more about our daughter and what milestones she’s currently hit at 1 year old. My only recommendation would be to place in a spot more visible/ readable for guests, as we had on the coffee table in our entry way room and presents eventually got stacked around it so it wasn’t as readable (or for guests who need to be up close to read, as the font size is small).
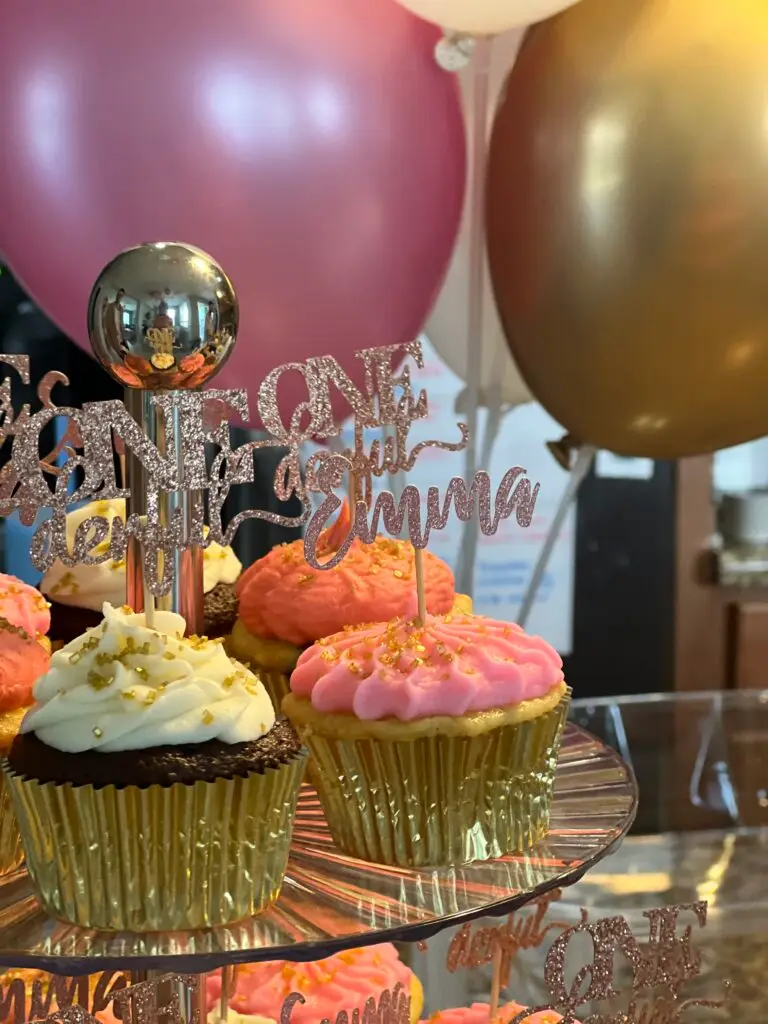
- Cake Topper and Cupcake Toppers (Amazon/Etsy): The cake topper in the Amazon kit was cute, but it wasn’t the gold glitter style I was looking for, so I purchased one on Amazon instead. As for cupcake toppers, I wanted a mix of toppers with my daughter’s name on them (purchased through Etsy) as well as toppers with our theme on them (purchased through Amazon). I was sold on these cupcake toppers from Etsy as the default image has my daughter’s name!
I love little décor pieces in/on food so I thought this was a debit, but they aren’t necessary, as everyone will pick out/toss the toppers in order to eat the cupcake/food. My cupcake toppers were rose gold glitter, which I felt added a cute touch, especially the toppers with my daughter’s name on them!
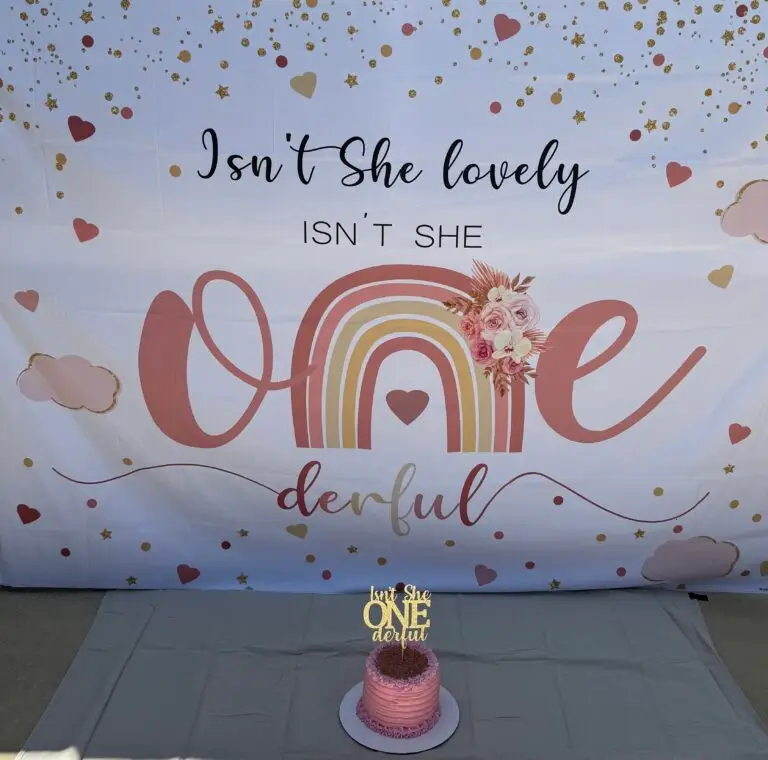
- Isn’t She Onederful decal for backdrop (Etsy): To be honest, I was hesitant to do a balloon garland as I have heard so many mixed feelings on them, with an overwhelming amount of people saying how difficult it can be/ how long it can take. However, I pushed those thoughts aside and committed myself to the balloon garland. And with the balloon garland I needed a backdrop, which I made out of a 4×8 foam board + decal (purchased from Etsy). This was our “photo backdrop” at the party.
I wanted this to be a debit so badly, but in the end, I think the amount of time and effort it took to create this backdrop (with the balloon garland) was not worth it. I think my husband, daughter and I were the only ones to take a photo in front of this backdrop at the party. Creating the backdrop was a pain from the beginning as neither my husband’s nor my car fit a 4×8 foam board, so we had to have my dad go pick it up with his truck. We then had to cut and paint the board (and cutting it was more of a struggle than we anticipated and resulted in styrofoam everywhere—thank goodness for shop vacs!). And painting anything is always a hassle to me, and I had to make at least two trips to Home Depot (we ran out of paint). We applied the decal the day before the party, which was probably the smoothest part. The balloon garland (shockingly only) took me a little over 2 hours to make. The below video tutorial was so helpful, as the balloon garland kit from Amazon was not helpful (glue dots do not work very well in my opinion, only for one off balloons to be added at the end to fill in spots). So, in the end, I would consider this décor item to be a credit.
- Party Shirts (Etsy): I found these cute shirts on Etsy which matched the invitation perfectly! And my husband, daughter and I were able to match for the party (until the cake smash when my daughter got her onesie all messy – which is why I had a backup outfit planned for her too!).
I say debit! Who doesn’t love a good matching shirt? And we managed to get a few photos together in them, so we will have that memory always. Were the shirts worth the money—maybe? I think there are cheaper alternatives if you don’t want to go with all matching shirts – you could color coordinate to go with the theme, which would also be cute.
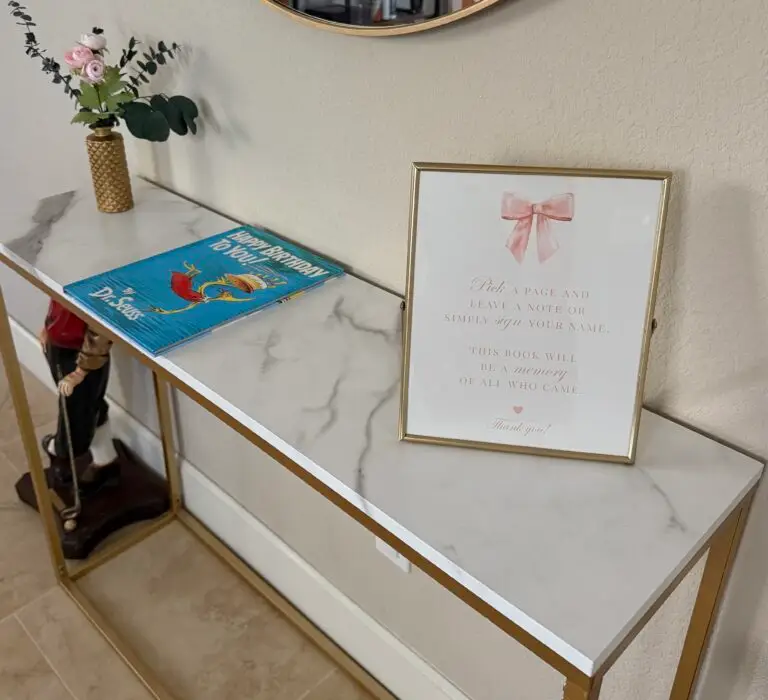
- Guest Book (Amazon): I saw the idea to use Dr. Seuss’s Happy Birthday to You book as a guest sign in book for the party and loved the idea! I’m usually not a fan of guest books, as it can be a hassle to sign the book, say if someone is already signing or forgetting to come back to sign it. But I wanted a book to remember everyone who came to our daughter’s party (as I am terrible with taking photos during events + I don’t expect future birthday parties to be as large as this party).
I am a little bias as I already did not have an affinity to guest sign in books, so I consider the concept of a guest sign in book as a credit to décor. But the book itself is super cute, and I can’t wait to read it to my daughter on each of her birthdays! There were multiple people who did not end up signing the book (as they did not see it (even though it was on the entry way table upon entering) or they forgot to come back to sign it after someone else was already signing it). So in the end I had to hand write in some guests names into the book (as I didn’t want to forget who came), but it did not have their personal touch or message.
- Balloons with Party Faces (DIY): As mentioned above, I knew I wanted to DIY some of the décor for the party, and I saw the idea of making a garland of baby’s faces with party hats and loved it. However, I tweaked the idea to add the baby’s face with party hat at the bottom of a balloon string. I purchased a dozen balloons from Michaels and picked up the morning of the party, and then added the pre-made baby face party hats. Again, another struggle picking out which photos to use as baby faces (some examples had the same photo used with different colored party hats, some had different photos used with the same colored party hats, or black and white photos with colored hats — the options were plenty). I ended up selecting different photos (natural color, not black and white) and making different colored party hats. I ordered a scrapbook of party themed pages that I used to cut out triangles for the party hats, and then hot glued a pom pom onto the tip. This is the beginning of my crafting era, that I can’t wait to expand on as my daughter gets older (I can’t wait to help her with school projects!). I then hot glued the completed party hat to the faces that I cut out of the photos. One important thing to note is the weight of your photos + party hats, as one helium filled balloon did not hold up my DIY baby face party hats, so I had to attach two balloons to one baby face party hat (which ended up working out, but was not exactly what I envisioned).
If you liked DIYing some parts of a party, this would be a debit for your décor. It was a fun craft project that I got to work on over a few weeks (as I had time to prepare), and the end product turned out so cute! Who doesn’t love more baby photos at a 1st birthday party??

Food
Once the RSVPs were finalized (I set the RSVP date 2 weeks before party—I know this was also probably a bit early but I wanted to allow time to follow up with any guests who had not RSVP’d), I was then able to determine how much food would be needed. We wanted to do something simple for food, so we went to Costco the day before and picked up a platter of shrimp, cheese and meat and cracker varieties (for the charcuterie board), two platters of sandwiches, and chips/pretzels. We also purchased all of our drinks from Costco as well. This was a cheaper and stress-free way to make sure we could feed everyone without having to cook/spend a ton of money. I did DIY the charcuterie board by making it the morning of (this was a bit stressful, as I ran out of time at the end before a few guests arrived). I wanted to use these O N E charcuterie board letters, so I cut up all of the cheese and I made some meat roses to look cute. While it turned out OK in the end, I definitely think I could have done better if I had more time (and maybe cut the cheese up ahead of time).
Party
Lastly, CELEBRATE! You as parents made it through ONE whole year and you should be so proud of yourselves. From experience, I know that first year can be taxing, it is no easy feat. While the birthday party is a celebration of your baby turning one, it is also a celebration of you finishing one year of parenting. Cheers to making it to year two! I can’t wait to see what this next year brings!